TIME FOR A SOLUTION!
So now that you have some idea of why the problem has occurred, its time to run through some of the solutions so that a sticky G# won’t hold you back in the future. Firstly, some preventative measures:


The first thing to remember is that you are not alone! Sticky saxophone pads are a common problem that affects all players, on all types and models of saxophones. Whether you’ve been playing for years or just picked up your instrument last week, and whether you’re playing a top-tier, gold-plated saxophone or a beginner's model, you’ll likely encounter sticky pads at some point—often at the most inconvenient moments.
Sticky pads are generally easy to address in the short term, and fixing the issue doesn’t necessarily mean you’ll need an immediate trip to the saxophone repair shop.
First, it helps to understand the mechanics of your saxophone’s key system and how it impacts the pads. Most keys on a saxophone are sprung open, meaning you press them to close the pad over the tone hole. However, certain keys—like the G#—are sprung closed. In other words, when you press the G# key, it has to open the pad, allowing the note to play. This is where the sticky pad issue often arises.
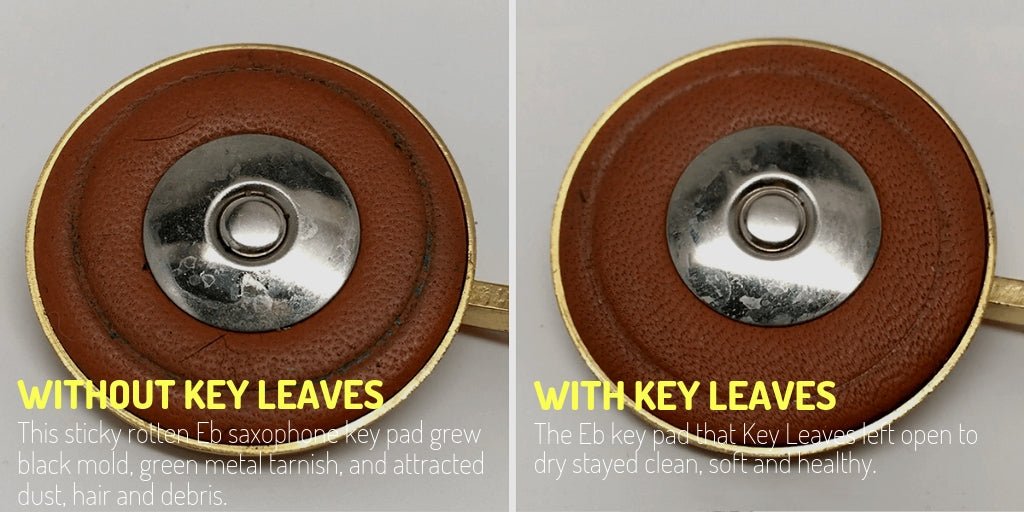
Over time, as you play, a combination of warm air and moisture (along with some saliva) travels down your instrument, condensing and leaving a residue on the pads. With keys that stay open, this is less of an issue as the residue evaporates. However, with keys like G# that remain closed, the residue can build up on the pad, eventually leading to stickiness.
The G# mechanism is unique in another way as well. It operates with two parts: the touchpiece, which you press with your finger, and the cup, which holds the pad and seals over the tone hole. The touchpiece serves as a lever, applying pressure to keep the pad closed until you press it to release. This system requires a strong spring to keep the touchpiece steady, while the cup relies on a slightly weaker spring to open and close. When residue builds up, the weaker spring may struggle to lift the pad, leading to a sticky, unresponsive key.
Understanding this setup can make it easier to identify and manage sticky pads on your saxophone—ensuring you stay prepared for a quick fix when needed.
So now that you have some idea of why the problem has occurred, its time to run through some of the solutions so that a sticky G# won’t hold you back in the future. Firstly, some preventative measures:
After every practice session, swab the inside of your saxophone thoroughly. Using a quality, absorbent swab helps to remove any moisture or residue left from playing, which is the primary cause of sticky pads. Make sure to focus especially on the upper and middle sections of the saxophone where moisture tends to collect.
Another popular device is the new Silverstein Airswab. This device delivers a powerful stream of air directly onto the pads, effectively removing any residual moisture after playing.
SAX CLINIC TOP TIP: When using a pad saver, do not place in back inside the saxophone until it has dried.
Your saliva is affected by what you are eating and drinking – try not to drink tea, coffee or consume sugary drinks and snacks whilst playing.
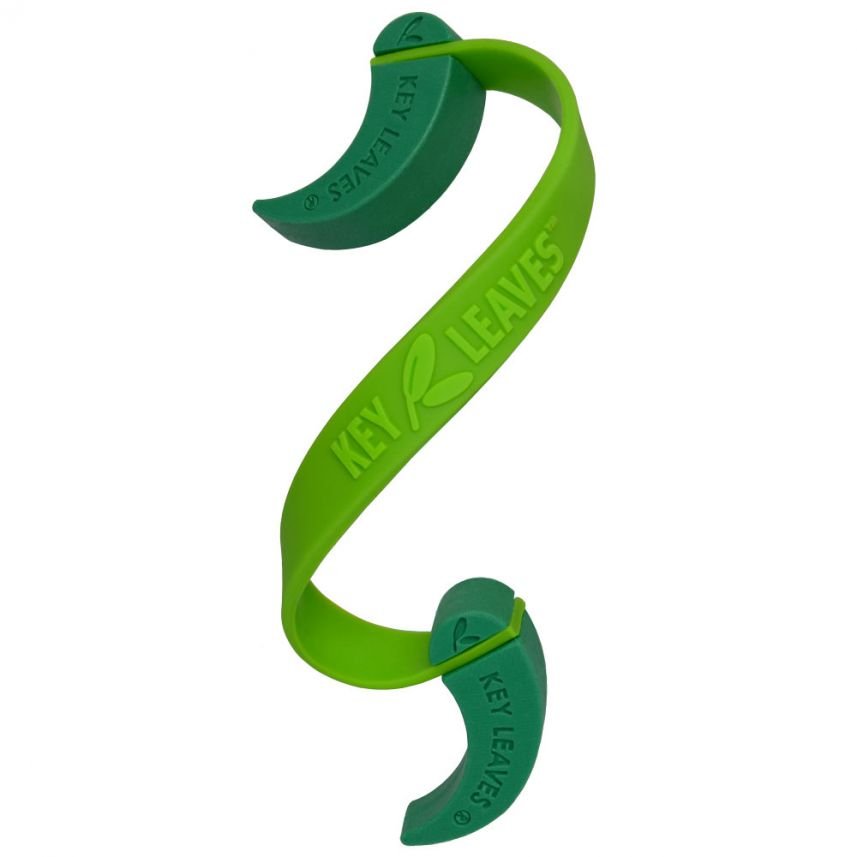
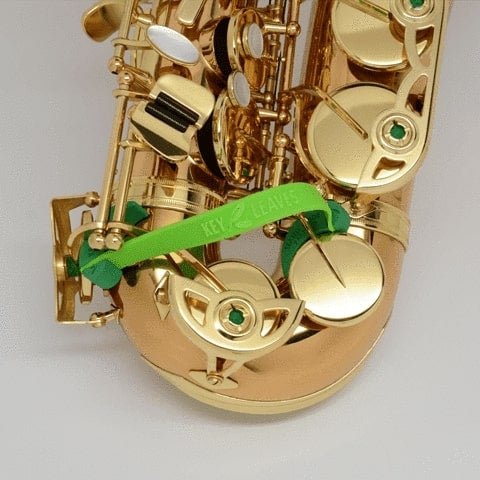
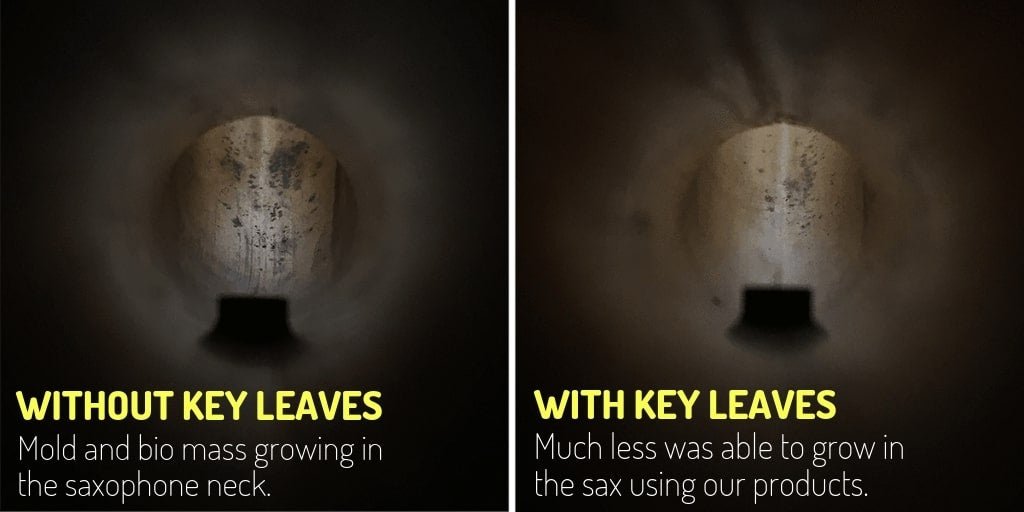
On most modern saxophones, the G# mechanism is also connected to the low C#, B and Bb keys. This is called an articulated system. It means that if any of these other three keys are operated, the G# key will also be opened at the same time. When putting your Sax away, after cleaning it out, you can place Key Leaves under the low C# pad. This will hold the both the C# and the G# pads slightly open, allowing them to dry without being under pressure and so help to prevent stickiness.
Okay, so you’ve tried hard to keep everything clean but the G# has refused to co operate and has started to stick…
We need to clean any sticky residue off of the G# pad. There are a couple of products out there that can help with this:
Comes as a small booklet of sheets of paper coated with a talcum like powder. Take a single sheet, and place it under the offending pad. Close the pad onto the paper and then draw it out slowly. It will leave a small coating of powder on the pad that will prevent stickiness. Whilst powder paper can provide immediate relief from the problem, it can also create issues of its own. Firstly it does not clean the residue from the pad that is the main cause of the problem, and secondly if you are a particularly wet player then over use of this method will cause further build up of residue (imagine talcum power mixed with water being pasted over your pads and you get the idea). Best used sparingly and is only appropriate in certain situations.
DO NOT USE IN CONJUNCTION WITH CLEANING FLUIDS.
The traditional method for de-sticking pads has always involved Rizla papers, and you may have noticed other players carrying packs of them in their cases. This is not because they’re heavy smokers, but as an emergency fix in the case of a sticky pad. Great as an emergency fix, but often too small and too thin to work effectively on saxophone pads. Better for smaller instruments, and the gummed edge can also cause issues. Can be used in conjunction with cleaning fluids.
Great for using to clean specific areas, both on the pad and on the tone hole. Can be used in conjunction with cleaning fluids. Excellent for those hard to reach places, although you should still be wary not to knock any important adjustment corks or springs out of position.
All of the above methods are best used in conjunction with liquid lighter fluid as a cleaning agent. It is usually available from any news agent – make sure you have the liquid and not the gas canister. Lighter fluid works well as a degreasing agent without being too harsh on the pads (methylated spirit is not recommended for this reason). It should be used sparingly, a little sprinkled onto the paper you are using and then the paper placed between the pad and the tone hole. As you slowly draw the paper out you may see green or black residue on the paper. This is evidence of the dirt you’re cleaning off! Repeat a few times if necessary, and the stickiness you are experiencing should resolve itself.
Well, that should hopefully bring an end to your trials and tribulations with sticky G# keys! Occasionally, if the problem is extremely persistent, then more drastic measures can be taken but these really do require a visit to the workshop!
Also it is worth noting that whilst we have been through the most common cause of sticky G#, it can sometimes turn out to be caused by a different issue. If the key work has been bent, or if there is an issue with the spring then other problems can arise. In any case, it’s always a good idea to try these methods first, and if further issues continue then give the workshop a call and we will be happy to run through the issues with you!